Transfer Drift
Why Plaster-Free Systems Create New Problems
Removing plaster is not enough. Most magnetic mounting systems introduce four new sources of error. Here's the engineering behind the problem.

Dental Technician Inventor & Founder
The promise vs. the reality
Every plaster-free system makes the same promise: faster mounting, no mixing, no cleanup, no waiting for plaster to set.
The promise is real. Mounting a printed model magnetically is faster than plaster, and nobody who has done both argues otherwise.
But speed was never the job. Plaster, for all its mess, does one thing well: it holds the model where your hands put it. A system that replaces plaster inherits that job. Speed without fidelity isn't an upgrade. It's a trade-off nobody prints on the box.
So the real question isn't "Is it faster?" It's this:
Is what you verify on the articulator still what you designed in CAD?
You spent an hour placing contacts on screen. You mount the model, close the articulator, and the pin doesn't reach zero. The contacts are not even close and they're not where you put them. Now the hunt begins: the scan, the alignment, the design, the printer.
With most plaster-free systems, the honest answer to that question is: you can't be sure. Not because the idea is wrong, but because of four engineering decisions shared across most of the category. Each one adds a new source of error to your chain.
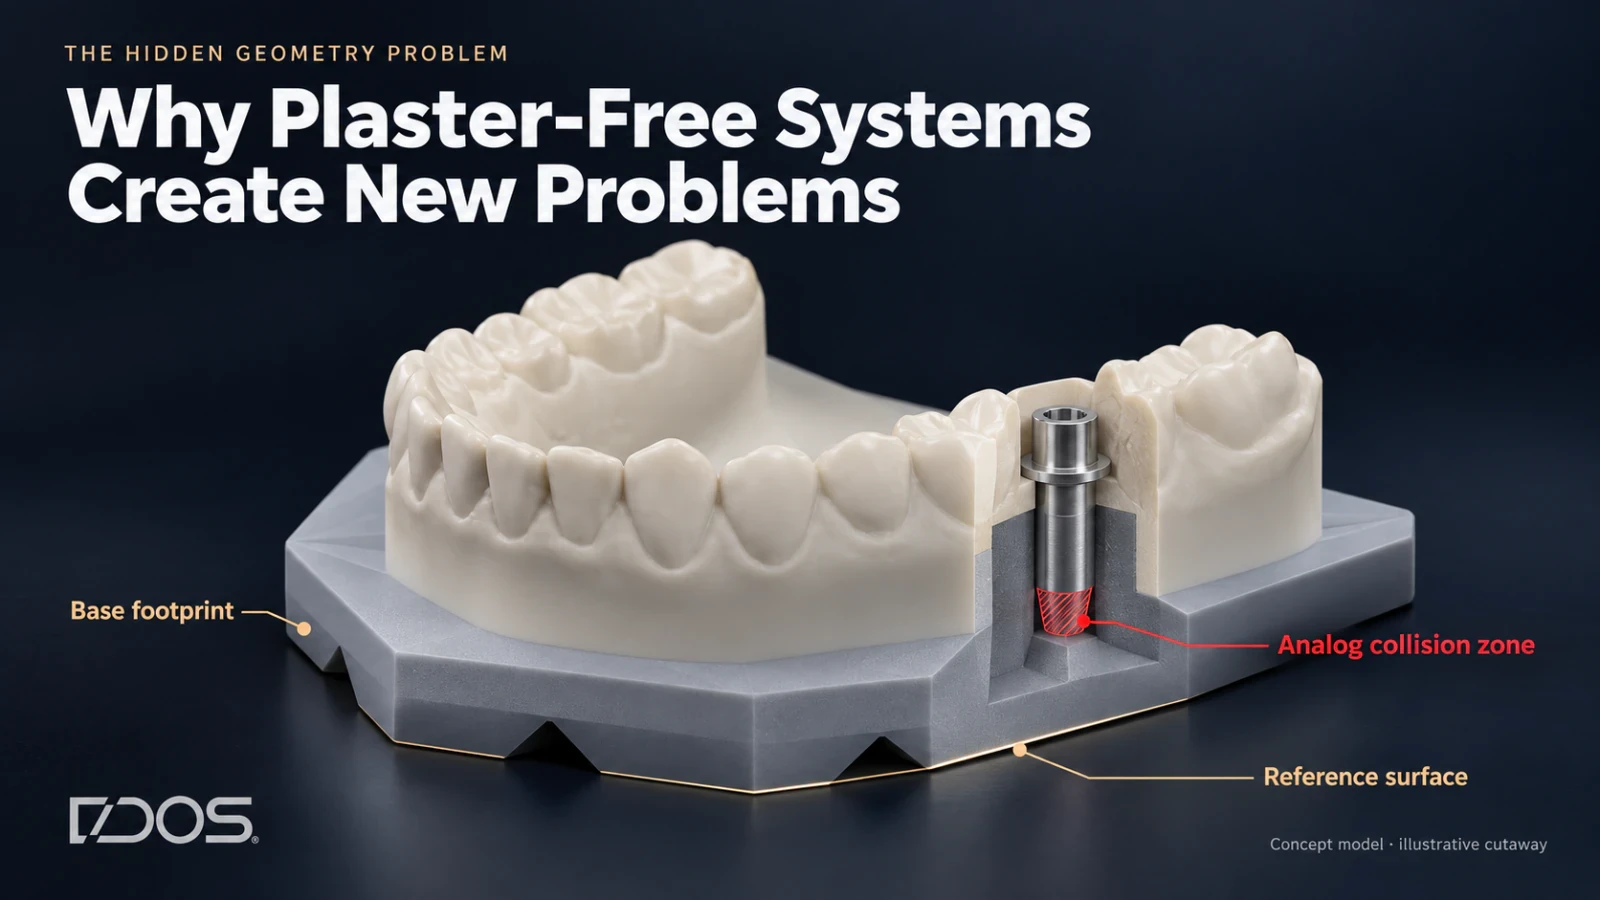
Problem 1: Bulky bases that collide with implant analogs
Look at the base of a typical plaster-free model. It's wide, thick, and solid, a footprint that looks a lot like a plaster mounting block. That's no accident. Most systems adapted their geometry from traditional articulator mounting instead of designing it for a printed model.
On a single crown, that's tolerable. On an implant case, it's a collision.
Implant analogs extend down into the model base. When the analog at position 5 needs that space and the mounting base already occupies it, the two physically intersect. In CAD you see an overlap you can't resolve. On the bench you have three options, and none of them is good:
Grind the base. You clear the analog, but you're removing material from the surface that defines the model's position on the plate. The reference is no longer the reference.
Work around it. Cut the base away around the analog in CAD, thin out the seating area, and accept that the model now rests on less than it was designed to rest on.
Go back to plaster for this case. Which means running two workflows: one for simple cases, one for the cases that actually pay.
The third option is the one most labs end up choosing, and that tells you everything. Full-arch implant work (All-on-X, bars, hybrids, overdentures) is the highest-value, most occlusion-critical work a lab does. It's also exactly where a bulky base fails first.
A mounting system that can't handle your most complex case isn't a system. It's a shortcut for your easy ones.
The problem isn't the magnets, and it isn't the idea of plaster-free mounting. It's the base geometry itself: a shape inherited from the process it was meant to replace, not designed for the process it actually lives in.
Problem 2: A base that dictates how you print
The second problem follows from the first. A bulky base wasn't designed for a printer, and the printer notices.
To protect the surfaces that mate with the plate, many systems need the model printed at an angle, often around 45°, instead of flat on the build plate. On paper that's a slicer setting. In practice it changes everything downstream:
Build height goes up. An angled full-arch model stands far taller than one lying flat. More height means more layers, and every layer is another chance for small errors to accumulate in Z.
Supports land where you care. At an angle, supports touch the model in areas they never would on a flat print. Every contact point leaves a mark, and every mark is finished by hand.
Plate capacity drops. Flat models nest side by side. Angled models eat space. Fewer models per print, more prints per day.
Print time goes up. Taller builds mean longer jobs, on every case, every day.
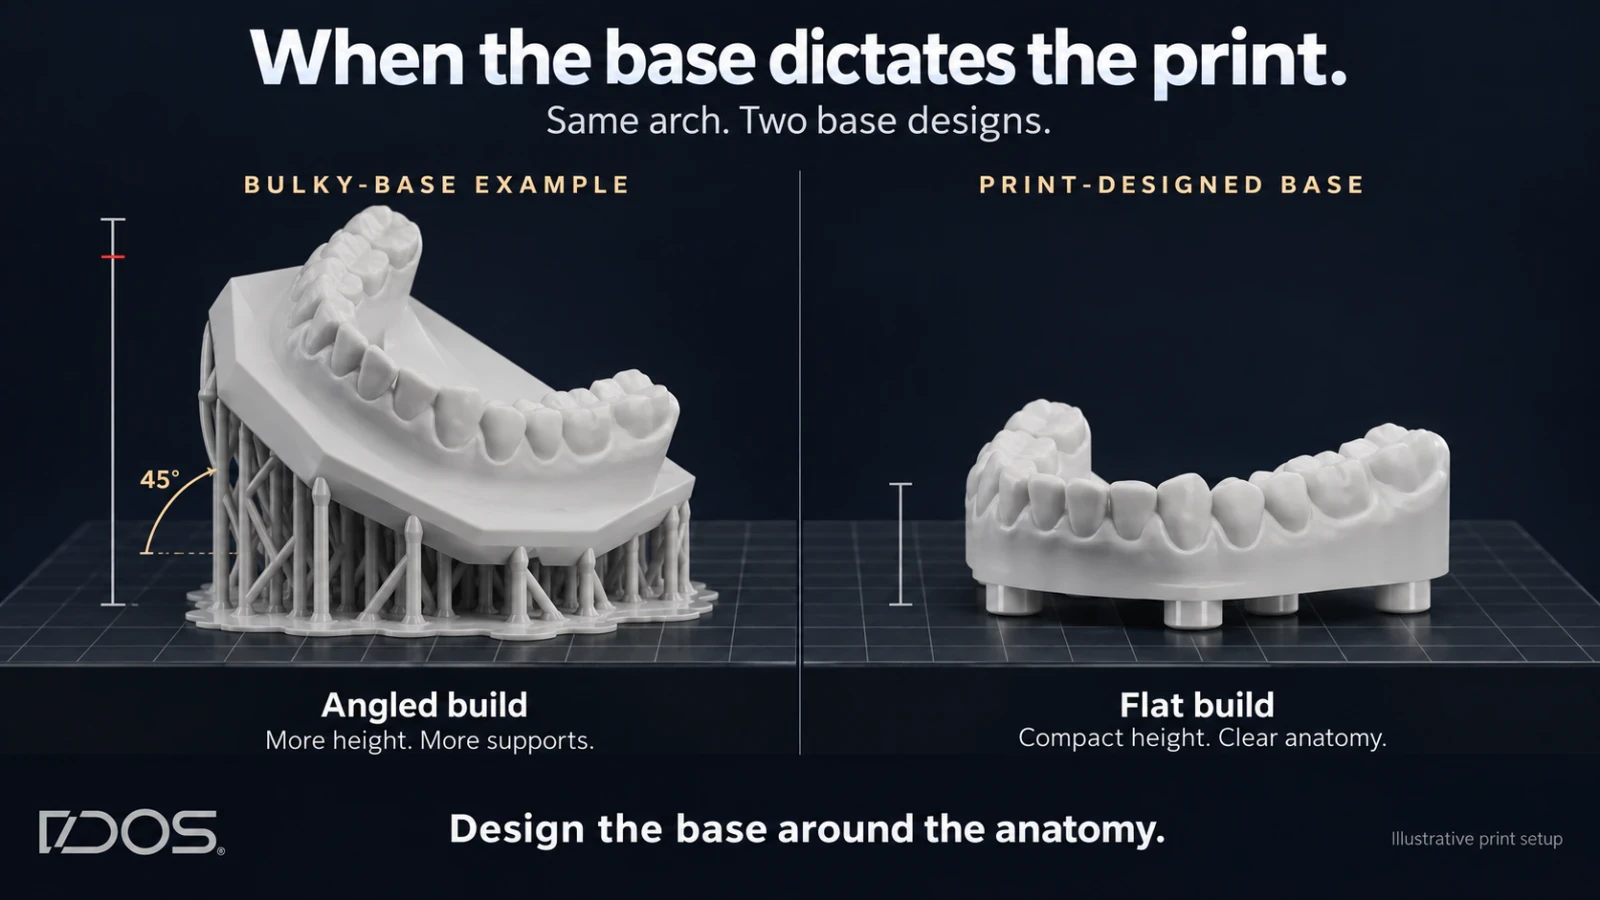
And the most important consequence: the teeth pay for the base.
The teeth are the clinically critical part of the model: the occlusal anatomy, the contacts, the margins, the reason the model exists. Their print orientation should be chosen for them. For a model, that usually means flat. When the base forces the angle, you're optimizing the least important part of the model at the expense of the most important one.
Every experienced technician knows the order of priorities on a printed model. Anatomy first. Everything else serves it. A mounting system that flips that order has its engineering backwards.
The fix isn't a better support strategy or a slower print. It's a base geometry designed for additive manufacturing from the start: one that prints flat, keeps supports away from the functional surfaces, and still seats precisely on the plate.
Problem 3: One configuration for every case
Open the CAD library of most plaster-free systems and you'll find one magnet arrangement. One position, one pattern, applied to every model.
That makes sense if every case looks the same. They don't.
A single-unit model with healthy neighbors is the easiest case your lab sees. A full-arch with four or six implant analogs, a removable die section, a bar attachment, or a deep undercut is not. Each of these occupies space in the model base. With a fixed configuration, there's no way to tell the system "not here."
So when the anatomy and the magnet pattern disagree, the anatomy loses. You redesign the base around the hardware, weaken it where the two overlap, or reach for plaster again.
This is the difference between a product and a system. A product works for the case it was designed around. A system is designed for the cases you actually get, including the complex, high-margin ones that build your lab's reputation.
Most plaster-free systems were designed around the simplest case: no analogs, no removable dies, nothing in the way. That's why they demo well at trade shows and struggle on a Tuesday afternoon with an All-on-6.
A mounting system for a modern lab has to let you choose where the magnets go, case by case, inside the CAD software you already use. The configuration should adapt to the anatomy, not the other way around.
Problem 4: Assuming the articulator is right
The fourth problem is the quietest. Most plaster-free systems assume your articulator is accurate, and assume your printer prints exactly what the file says.
Neither assumption is safe.
Articulators are mechanical instruments with their own tolerances: mounting plates that don't seat identically, hinge play, wear from years of daily use. Two articulators of the same model on the same bench won't necessarily hold a plate in the same place. Your printer, resin, and curing protocol leave their own signature on the model too: a consistent vertical offset here, a slight in-plane difference there.
A system with no calibration step treats all of this as zero. It ships a plate built to nominal dimensions, hands you a nominal model, and expects the two to meet exactly where the CAD file said. When they don't, nothing in the workflow tells you why.
Now add it up. A base geometry not designed for printing. A print orientation dictated by that base. A fixed configuration that fights complex anatomy. No calibration against your own equipment. That's four variables the system introduces, stacked on top of the ones you already manage: scan, design, printer, resin, curing.
Nobody measures the sum. Most systems don't even acknowledge it exists. And when the pin doesn't close, the transfer is the one suspect nobody puts on the list.
To be clear: calibration can't fix a worn hinge. That's maintenance. But a system that calibrates against your own printer, resin, and articulator stops assuming, so the consistent offsets your setup carries don't travel silently into the mount.
The category needed a better answer
None of this is a marketing jab. These are engineering consequences, and anyone who has mounted a full-arch implant case on a plaster-free plate has met at least one of them.
Plaster-free mounting solved the easy part: getting rid of the plaster. The hard part, making sure the model lands on the articulator exactly where the CAD design put it and stays there, was left unsolved.
Solving it takes a different starting point. A base geometry designed for 3D printing, not borrowed from plaster mounting. A configuration that adapts to the case. A calibration step built on your own printer, resin, and articulator. And one standard to judge it by, visible on the first mount: the pin closes to zero, the contacts on the articulator are the contacts you designed, and the model doesn't move.
That's the system we built at DACOS. In the next post, I'll show you exactly how it works.
See the system built to solve all four problems →
— Antonello
DACOS technology is protected by a pending international patent application.